Cách fake IP sử dụng SSH | How to fake IP using SSH
1. DOWNLOAD CÁC PHẦN MỀM CẦN THIẾT (DOWNLOAD NECESSARY TOOLS)
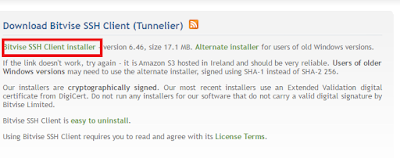
- Bitvise SSH Client:
Tải về và cài đặt bình thường (Download and setup normally).
- Profixier 3.21 Full: Link download
Sau khi cài đặt Profixier, chạy và chọn "Enter registration key" để điền key. Key nằm trong file key.txt trong bộ cài đặt tải ở link trên. Name chọn tên gì cũng được.
(After setup Profixier, launch it and choose "Enter registration key" to enter key. The key is included in file key.txt downloaded. Any name is ok).
2. CHẠY BITVISE | RUN BITVISE
Trước hết bạn cần 1 con SSH chạy được, bạn có thể kiếm trên blog của mình (hoặc bạn có rồi thì dùng, tùy bạn, miễn là SSH), check những con mới vì con post lâu rồi có thể đã die.
SSH có dạng: 216.244.111.138|admin|default|United State (US)|Unknown|............
(Before begining, you need a live and fresh SSH, you can find one on this blog)
Ở phần Login:
- Host: Bạn điền địa chỉ SSH (ở ví dụ trên là 216.244.111.138) (Enter SSH address, example 216.244.111.138)
- Port: 22
- Username: điền username của SSH (ở ví dụ trên là admin) (Enter SSH username, example admin)
- Initial method: tất nhiên chọn password (Choose password)
- Password: điển pass của SSH vào (ở ví dụ trên là default) (Enter SSH password)
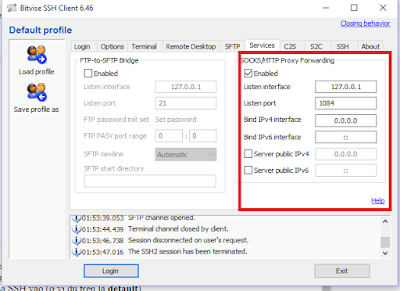
Chuyển sang tab Services
- Tích vào ô Enable trong phần SOCKS/HTTP Proxy Forwarding
- Listen enterface: hãy cứ điền 127.0.0.1 (Just enter 127.0.0.1)
- Listen port: Cái này điền tùy bạn, thông thường điền 1080, ở đây mình điền 1084 (Normally, enter 1080, in my example, I enter 1084)
- Còn lại: để mặc định (remain: just leave it default)
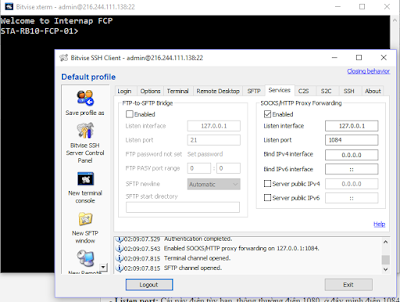
Kích vào nút login (Click login button)
- Nó sẽ hiện ra một cửa sổ lệnh kiểu MS-DOS, hoặc nhiều hơn, đấy là biểu hiện của vào được SSH. (One or more tab pops up, it's ok)
- Nút login sẽ chuyển thành logout. (Login button becomes Logout button)
- Như hình là ok. (Like this pic)
3. CHẠY PROFIXIER | RUN PROFIXIER
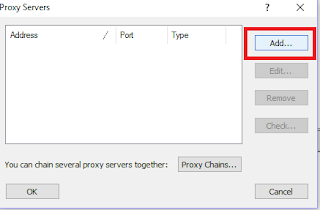
Add
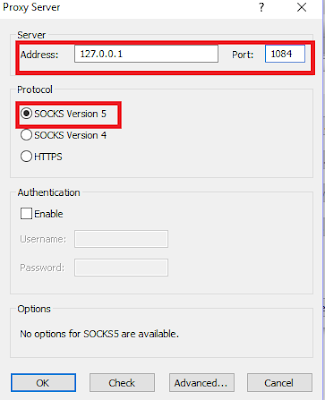
- Adress: 127.0.0.1.
- Port: Chính là listen port bạn điền ở bitvise, nãy nếu bạn chọn là 1080 thì điền là 1080, như trong ví dụ mình lỡ điền là 1084 thì mình điền 1084. (It is listen port you chose above, in my example I chose 1084 so I enter 1084).
- Enable SOCKS Version 5.
- OK.
- Nó sẽ hiện ra một bảng hỏi có muốn đặt chọn proxy này làm mặc định không, chọn YES rồi OK, OK. (It will show up ask if you want to use this proxy by default, choose YES then OK, OK).
----------------
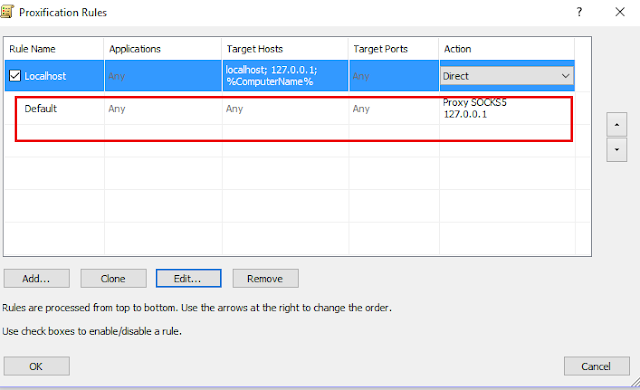
Thông thường về cơ bản là đã fake IP xong, để cho chắc ta check lại.Vào Profile -> Profixication Rules. (check again)
Như hình là ok. Nó có nghĩa là toàn máy đã được fake IP. (Like pic is ok, all your computer is faked IP)
DONE
Tips: Bạn có thể dùng profixier để fake IP cho từng bộ phận của máy, ví dụ chrome, firefox... hoặc không cần dùng Profixier mà vẫn có thể fake IP cho trình duyệt; nhưng mình không muốn lan man ở đây, bạn có thể đọc ở bài khác của mình. (You can use profixier to fake IP for a part of your computer such as chrome, firefox... even you can fake IP chrome, firefox without profixier, but I don't want to write too long in this post, you can read about it in my another post)
4. KIỂM TRA LẠI IP | CHECK AGAIN
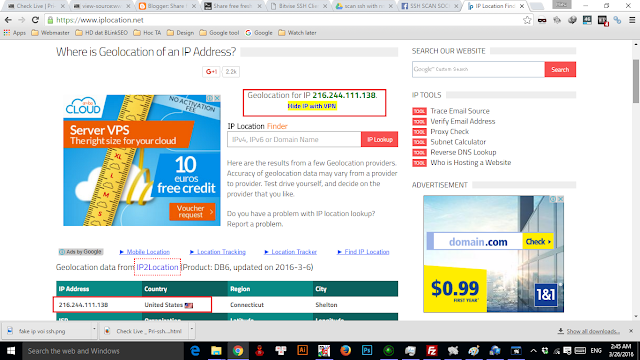
Bật trình duyệt lên, vào whoer.net hoặc iplocation.net để kiểm tra lại IP của máy. (Go whoer.net or iplocation.net to check your IP)
THÀNH CÔNG, CHÍNH LÀ CÁI IP CỦA SSH ĐÓ!
SUCCESFULLY!
-------------------------------------------


